July 31, 2009

Spicy Blueberry-Citrus Marmalade.

Well, I have received two requests for a specific jelly flavor combinations. The first was Jalapeño Peach jelly, requested by my friend Mandy (which I will make soon).
This is the second:

IMG_9923

Spicy Blueberry-Citrus Marmalade:

1 valencia orange.
1 meyer lemon.
1 persian lime.
2 cups of water.
1 teaspoon crushed red pepper flakes.
2 cups of sugar.
2 cups fresh blueberries.

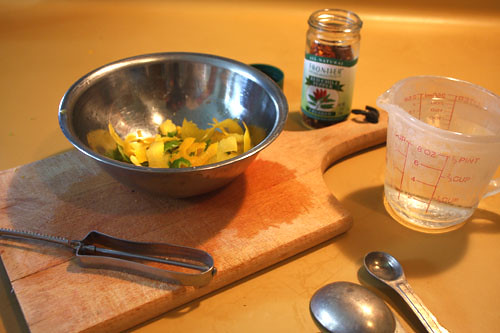
Start by thoroughly scrubbing your citrus, especially if you are using store bought fruit. This is important because we will be using the skin for this recipe, and you do not want anything disturbing the natural flavors.
Next, you want to cut the rinds from the orange, lemon, and lime from the fruit in thin strips. I used a normal peeler, which worked well and made for irregular strips - which is nice. Set the strips aside.
Slice the citrus trio in half and use a reamer to extract as much juice and pulp as you can and set aside. Be sure to remove any seeds from the juice.

IMG_9936

In a dutch oven, bring two cups of water the citrus strips and red pepper flakes to a boil. Cover, reduce heat, and simmer for about 30 minutes or until the rinds a tender. At 25 minutes, mine ended up on the firm side of tender - which I really liked.
Start your jars to sterilizing in a boiling water bath.

IMG_9940

Now add your blueberries, sugar, and citrus juice and pulp to the pot. Bring to a full rolling boil, stirring often (222˚F). After about 15 minutes it should start getting syrupy. Remove from heat and if any foam has formed skim it off - foam can have adverse effects of headspace if you are canning the marmalade.
Ladle directly into hot, sterilized jars (it jells fast). Leave a quarter inch of headspace. Remove any air bubbles and be sure to wipe our rims clean. Lid directly and process in a boiling water bath for 10 minutes.

IMG_9948

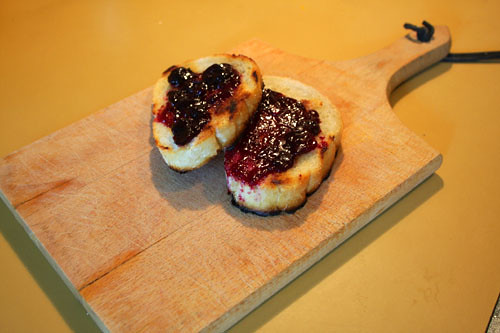
I had some left over, so I quickly threw some french bread on the stove for toast and spread it over. I really love the consistency - the blueberries spread like preserves. I was also impressed by the flavor. It is tangy, and more tart than sweet, and finishes with a pleasant burn in the back of your mouth after you swallow. Success tastes sweet.

IMG_9965

That is all.

jon.

p.s. if anyone has any requests...

July 30, 2009

Creamy Cucumber Salad.

I am a big fan of creamy salads, pickled foods, and dill. So, with two pounds of nice hothouse cucumbers looking for something to turn into and some fresh homemade yogurt, I worked up a wonderful, cool summer salad.

IMG_9960

Cucumber Salad:

4 hothouse cucumbers.
2 small red onions.
4 cups plain yogurt (I used mine).
1 cup sour cream.
2 tablespoons white wine vinegar
1/2 cup fresh dill.
freshly ground black pepper.
kosher salt.

Thinly slice the cucumbers into rounds and the red onions into half rounds - I used a mandolin. In a bowl, mix the cucumber and red onion slices with 1 1/2 tablespoons of salt. Dump the mixture into a colander and suspend it over the bowl. The salt pulls out some moisture and starts pickling the vegetables.
Pour the yogurt into a cheesecloth lined sieve and suspend over a bowl - this thickens the yogurt by removing some of the liquid.
Cover both and put them in the fridge overnight. Discard any liquid that forms in the bowls.
When the cucumbers and onions are ready, roll them into a clean kitchen towel and press to remove any remaining liquid. Place them in a large bowl and add the yogurt, sour cream, vinegar, and minced dill. Toss together and refrigerate for a couple hours to let the flavors mingle. Serve chilled and add salt and pepper to taste.
The resulting salad is a crisp and tangy treat, perfect for a hot summer day. So, make it and enjoy because it is hot out there.
That is all.
jon.

July 29, 2009

Yogurt.

Keeping the fermentation going. Inspired by my friend Amy's failed batch and a fellow food blogger's recipe , I decided to try my hand at yogurt making on Sunday.
Now, my knowledge of yogurt is limited to what I like and I certainly have never made my own, but the recipe seemed too straight forward to not try:

"A quart of milk + half a cup of good yogurt + heat + time =
Two pints of homemade yogurt!"

IMG_9908

I chose Promised Land Reduced Fat 2% Milk and for the yogurt I used White Mountain Bulgarian Premium Whole Milk Yogurt. Go Texan!
The blogger continues:

"I just heated the milk to 170º F, cooled it down to 112º F, added the yogurt starter, and poured the mixture into warm jars. I left the jars full of pre-yogurt soaking in hot water (108-112ºF) inside a cooler (with a meat thermometer keeping track of the temperature... I added more hot water when it cooled below 108º F). 6 hours later - yogurt! "

Following these directions, I also ended up with two pints of yogurt. The consistency is not quite as thick as the original but the taste is the same. Yum!

IMG_9983

I think I will look out for ways to improve on my results (maybe less milk, maybe whole). Perhaps I will try a different starting yogurt - though this one is my favorite.
That is all.
jon.

July 26, 2009

Brining cucumbers.

I have really been feeling good about all of my food-based projects. I enjoy all of the researchand experimentation I have been doing - and with resources like:
and
I am learning so much.
Time to try pickles. In my research I have found that there are many different pickling recipes out there. There are the traditional fermented cucumber in a ten percent brine solution. Then there are the "easy" recipes - basically, cucumbers in a jar with vinegar solutions. There are also the transitional recipes that mix traditional brining fermentation with jarring in vinegar solutions.
I, being most interested in traditional methods, chose to try fermenting/brining. Brining preserves food by anaerobic fermentation, which, by producing lactic acid, achieves the correct pH to destroy toxic bacteria. Sounds fun.
Starting with an antique crock that I recently ran across at an antique store. I paid about $40, which I thought was very reasonably price considering the condition of the glaze (crack free). When I got home and some quick research told me that Love Field Potteries in Dallas, Texas went out of business in 1948. Neat.


Test fitted with a cake pan.

I poured in a gallon of water and placed an egg in it. The egg, as I learned, is an easy measure of salinity - stir in your pickling salt and when the egg floats to the top the ratio is right (do not forget to remove the egg).

IMG_9898

Then I put my fresh, washed baby cucumbers and placed a perfect-fitting pyrex baking dish lid on top of the cukes (upside-down to avoid air bubbles) to keep them below the surface. A weight might be needed to help hold them down. I used a bowl with some water in it.

IMG_9900

To lid the crock, I used my handled pie dish and then tied it all up in an old flour sack to keep out dust and bugs. I tucked it way away, back in a low linen closet.
The day after I started, I added about a cup of salt to help maintatin the correct salinity.
Every few days I check the cukes for scum. While it forms naturally on the surface of the solution during the process, scum destroys the acidity that you are trying to maintain during the fermentation process and, if left unchecked, results in cucumber spoilage. And we certainly do not want that.
Now, we wait.
jon.

July 21, 2009

Pickled jalapeños.

Saturday morning I woke up early (considering the night before), and I took my friend Erika (and my hangover) to Froberg's farm. It was her first visit and I did my best to show her around. She took lots of photographs and will likely have something to say about the experience soon - she has in mind that this is the beginning of "Farm Tour," which I am totally in for.
While we were there, I picked up more strawberries, okra, eggs, and - you guessed it - jalapeños. They looked so good; Erika caught me lingering and suggested that I might could pickle some. Sold.


I did not have a specific pickled jalapeños recipe so I started with a generic recipe of water, vinegar, and salt. I added some of my pickling spice mixture and some sugar to (maybe) soften the burn a touch.

Pickled jalapeños:

1 pounds fresh jalapeños.
3 cups white vinegar.
3 cups water.
3 tablespoons kosher salt.
3 tablespoons raw turbinado sugar.
3 tablespoons pickling spice.
4 crushed cloves of garlic.

Start by piercing each pepper with a fork several times - this will allow the pickling juices to get inside and the hot to get out.
In a medium saucepan, bring to boil your vinegar and water with the rest of the ingredients. Reduce and simmer for five minutes.


Pack the jalapeños into your sterilized jars - I only managed about five peppers per pint jar.
Pour the vinegar solution into each jar - dividing the bay leaves and garlic - leaving an inch of headspace.
Lid the (clean-rimmed) jars and process in a boiling water bath for 35 minutes. Let sit for at least a week for maximum seasoning.
The sugar darkened the vinegar more that usual which makes for a dramatic looking jar of peppers.


My mouth is watering over these already. That is all.

jon.

July 18, 2009

Pickled okra.

I think okra is pretty fantastic. Did you know it is believed to have originated in the Ethiopian Highlands? Or that it is considered a fruit on the plant but a vegetable once removed? How about that the okra pods bloom into a hibiscus-looking flower?

IMG_9456

I have loved okra as long as I can remember. Fried was my favorite when I was a kid, but these days I enjoy it most in its fresher forms. I love it in gumbo and canh chua chay - especially when left as whole pods.
Pickled is good too - which is why we are here today.

Spicy Pickled Okra:

4 pounds young, small to medium okra pods
4 serrano peppers, halved
4 teaspoons mustard seeds
8 sprigs fresh dill
4 cloves of garlic
2 teaspoons whole white peppercorns
2 teaspoons whole cumin seeds
2 teaspoons whole coriander seeds
2 teaspoons fennel seeds
1/2 cup kosher salt
4 cups white vinegar
4 cups water

Start by washing the okra and trimming the stem (if needed). Be nice to your okra because it does bruise easily.
In a medium saucepan, bring to boil the vinegar, water and salt.
Then, in each of your sterilized jars, place one halved serrano pepper, one teaspoon mustard seeds, two springs of dill, a clove of garlic, white peppercorns, cumin seeds, corriander seeds, and fennel seeds. Pack the okra in the jars, like so:

IMG_9314

By now your vinegar should be boiling, so the remove the pan from heat and pour the mixture into each jar, leaving about a quarter inch of space. Be sure there is no air trapped down in the okra.
Process the jars in a boiling water bath.

IMG_9323

***

Several people have recently asked me about the timeline in which these pickled goods are ready. The answer is that it is flexible. You can eat the okra right away, but to get the maximum benefits of the herb and spices, I think, you should wait two to three weeks. I know - it is hard to be patient.
Make and enjoy. That is all.

jon.

July 14, 2009

Pickled eggs.


I love eggs. I love pickles. So, what comes next should come as no surprise:

Pickled eggs are hard-boiled and soaked in a solution of vinegar, salt, spices, and other seasonings.
For my eggs, I decided to use a simple, hand-me-down pickling spice mixture:

2 tablespoons whole allspice.
2 bay leaves.
1 cinnamon stick.
5 cloves.
2 tablespoons coriander seeds.
2 tablespoons ground ginger.
1/4 cup mustard seeds.
2 tablespoon dried red pepper flakes.

To help cut costs, I followed the advice of a friend, and took advantage of the bulk spice section at my local Central Market. The value is amazing - I got more than enough spices for my recipe, all for about a dollar.
Start by boiling a dozen eggs. Twelve minutes at a simmer is the key. Run under cool water for a few minutes finishing by filling the pan and adding ice. Set aside.


The number of eggs per quart will vary by size.

Next, combine your pickling solution:

1 tablespoon pickling spice.
2 teaspoon salt.
3 cups white vinegar.
1 cup water.
Heat the mixture to near boiling in a medium saucepan and simmer for five minutes.
While simmering, peel your eggs and loosely pack in a hot sterilized jar. Pour the hot pickling solution (spices included) over the eggs.
Wipe the rim of the jar and secure the lid - finger tight is good. Process jar(s) in a boiling water bath for 15 minutes.
The eggs are ready for serving when the pickling solution has seasoned all parts of the egg - two to four weeks should do it.


Sweet pickled perfection.

I am too impatient to wait for these batches to be taste tested, so I will just keep trying different recipes (I have several more I want to try), but I think we need to have a tasting... thing. Perhaps August 1st?
That is all.
jon.