August 20, 2009

Jalapeño Jelly.

With all of my previous batches, I have avoided adding pectin to gel the preserves. While I like to think it is in an effort to keep my ingredients lists as short as possible, the honest truth is, recipes that call for citrus rind instead seem more natural. To be clear, there is nothing wrong with pectin. After all, it is most often extracted from dried citrus peels or apple pomace left over from juice production. Using what would otherwise be considered waste is never a bad thing. This has been my rule for choosing recipes. Until now.

IMG_0419

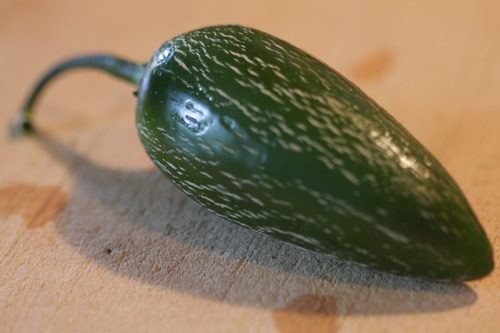
I was drawn to this recipe because it calls for jalapeños - and only jalapeños. Seeds and all. The other "jalapeño" jelly recipes that I came across called for just as much, if not more, bell pepper. I went on adventure to the farmer's market on Airline the other day with my friend Erika, waiting for something to call out to me to be transformed into a tasty jelly. I wandered around mostly in awe of everything going on around me when, finally, I found the most beautiful jalapeños in whole world. Jalapeño jelly came to mind instantly. They are certainly too beautiful and scarred up to be cut down with bell pepper. There was no way I can pass this recipe up - it is going to be fiery.

Jalapeño Jelly:

12- 14 jalapeños.
6 cups sugar.
2 cups cider vinegar, divided.
2 pouches liquid pectin.

Chop up all of the jalapeños and place them in a blender with one cup vinegar and liquify. CAUTION: The oils in peppers can cause burns. Do not touch your eyes or other sensitive areas after handling. Combine the purée with the remaining vinegar and sugar in a dutch oven.

IMG_0410

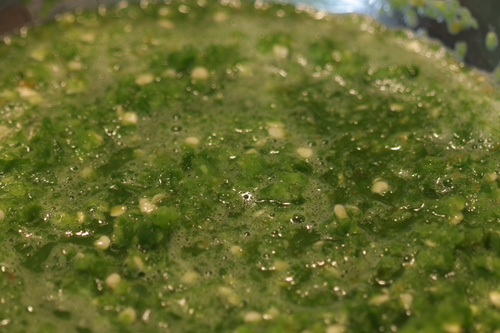
Bring the mixture to a boil over high heat. Boil for ten minutes, stirring often. Remove from heat.
Stir in two pouches of liquid pectin. Return to heat and bring to a hard boil for one minutes more. Remove from heat.
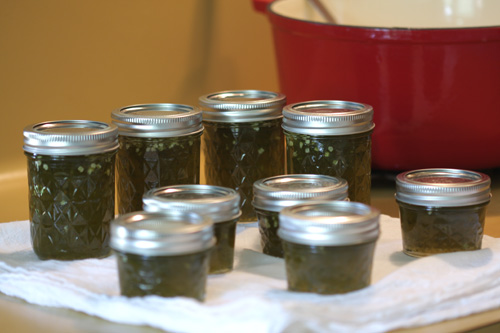
Ladle directly into hot, sterilized jars. Leave a quarter inch of headspace. Remove any air bubbles and be sure to wipe the rims clean. Lid directly and process in a boiling water bath for 10 minutes.
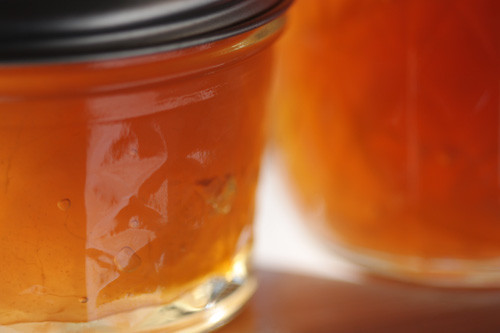
Makes about 4 pints.

IMG_0414

I was right - I did not try very much, just touching my tongue to the spoon, and my mouth was on fire - I thought for sure I was going to have heartburn instantly. It was so hot and good I had to try more. Later, I tried more with some cream cheese on a fresh jalapeño bagel from Hot Bagel Shop. Pure bliss.
I love making new favorite things.

August 14, 2009

baby loves mixtapes // volume 01

0725090743


Download here.

Tracklist:

01 youth tunes // Little Girls
02 On The Floor // Family Portrait
03 Green River // Real Estate
04 Blessa // Toro Y Moi
05 Walkabout (w/ Noah Lennox) // Atlas Sound
06 doki // friend
07 Rain On Radio // Woods
08 Bicycle Horrors Cosmic Dub // Memory Tapes
09 Sun Was High (So Was I) // Best Coast
10 Be My Girl // Smith Westerns
11 Good to Be // Magic Kids
12 More Stars Than There Are In Heaven // Yo La Tengo

Well, I pulled it off. I think. Just in time for the weekend - here is volume one of what I hope becomes a regular fixture of the blog. Baby loves mixtapes.
So, sit back, relax, listen and love... oh , and let me know what you think.

August 13, 2009

Pear-athon continues: Ginger-Pear Marmalade.

While the batches of pear preserves from last time were pretty fantastic, I was keen to expand upon the previous success by adding a new twist. This time I stumbled onto a bunch of red pears and a new, delicious sounding recipe.

IMG_0385

Ginger-Pear Marmalade:

8-9 medium red pears.
2 1/3 cups sugar.
3 limes limes (zest and juice).
1 tablespoon grated ginger root.

IMG_0365a

Start by washing and peeling the pears, then quarter and core them. Set them aside. Next, zest three limes - I used a peeler and then sliced the peel into short thin strips. I like the color and texture these strips add to the jar. Now, juice the limes, discarding any seeds.

IMG_0377a

Combine pears, lime strips and juice, and sugar in a dutch oven. Grate the ginger in.

IMG_0385a

Bring to a boil over medium heat, stirring frequently Boil until it begins to thicken - about 15 minutes or until you reach 222°.

IMG_0391a

Ladle directly into your hot, sterilized jars (it jells fast). Leave a quarter inch of headspace. Remove any air bubbles and be sure to wipe your rims clean. Lid directly and process in a boiling water bath for 10 minutes.
Makes about 2 1/2 pints.

IMG_0398

I love ginger and the flavor it adds to the pears - I think this might be my new favorite batch.

August 12, 2009

Pear-athon: Pear Preserves.

A couple days ago I got an email from a friend expressing his interest in learning how to make preserves, and as an incentive he offered to share a large box of pears, which he had collected from his parent's house. I was happy for the opportunity to share my new found passion with a friend for the first time, so I invited him over.

Pears

He showed up with a beer box near full to the top with beautiful, fresh green pears. They were beautiful in all their irregularities. They were firm, smelled tart and earthy, and seemed perfect for preserving. Now I have to admit, I do not recall ever having had pear preserves before, but as pears are one of my favorite fruits, we could not possibly go wrong.

Pear Preserves:

6-8 medium pears.
2 1/2 cups water.
3 cups sugar.
1 lemon.

IMG_0141

Start by washing and peeling the pears - be careful, they get pretty slippery. Now, quarter and core them. Place them in a large bowl and set aside. As thinly as possible slice a lemon into rounds and remove any seeds; set aside.

IMG_0138

Next, pour all of the water and half of the sugar into a dutch oven. Stir to mix and bring to a boil over medium heat. After two minutes, add the pear chunks and return to a boil. Be sure to stir often, it can stick fast. After about 15-20 minutes, add the remaining sugar and the lemon slices. The pears should just be softening at this point. As the pears softened I slowly began to chop them using my handy bamboo stirring spatula.

IMG_0154

Return the mixture to boil, this time over medium-high heat. Cook rapidly, stirring often, for another 25 minutes or so. The pears should be soft and fairly translucent and the liquid syrupy. Remove from heat.
If it does not start to gel, you can return the batch to the stove for a hard re-boil. It should only take a few minutes more. This is not ideal but you can thicken your preserves this way.
Ladle directly into hot, sterilized jars, leaving a quarter inch of headspace. Remove any air bubbles that might have formed and wipe the rims clean. Lid directly and process in a boiling water bath for ten minutes.

IMG_0172

Over a two evening run we made about eight batches, filling about 24 eight ounces and 20 four ounce jars. It was quite the marathon.

IMG_0247

We ended up with a substantial amount of variation. The first batch was the most like the preserves I had made previously - soft fruit chunks in a substantial gel. One batch we near completely neglected right at the end - the sugar caramelized into a deep brown gel with a very distinct flavor. The last batch, we went for a double and it never seemed to reduce correctly, ending more like a fruit-in-syrup than preserves. Overall the flavor was sweet and tart and I was reminded of sour apple flavored candies from when I was young, albeit more natural tasting.

IMG_0213

These two nights were the busiest and most tiring trials in home preserving I have experienced so far, and I tell you what, I slept like a baby afterwards.

August 6, 2009

Peach Party Part 2: Jalapeño-peach preserves.

IMG_0058a

About a week ago, I was telling a couple friends about making preserves over drinks, when my friend Mandy told me about how her family always made jalapeño-peach jelly. It sounded really good, so I asked about their recipe, but she said that she did not have it. As I ended up buying about 10 pounds of peaches this past weekend, I set out to find a recipe of my own. As it turns out, I did not have to look very far - my mom had this one:

Jalapeño-peach preserves:

8-10 medium, ripe peaches - peeled and quartered.
1/2 a medium orange - quartered, seeded, and thinly sliced (rind included).
2-3 jalapeños (seeds and all).
4 cups sugar.
3/4 cup clover honey.
1/4 teaspoon all-natural almond extract.
1/2 teaspoon of butter (optional).
water.

Wash and peel your peaches. Quarter them and discard the pits. Place them in a dutch oven, adding the sugar and honey. Cover and let stand for about 45 minutes (no heat).

IMG_0064a

In a food processor, combine the orange slices and jalapeños. Blend until finely chopped. Scrape into a medium saucepan and add an equal amount of water, about 2/3 of a cup. Bring to a boil, cover, and reduce heat - simmer for about 10 minutes.

IMG_0061a

Bring the peaches to a boil over medium heat, stirring until sugar has completely dissolved. Turn heat up to medium-high, and boil. Stir often.

IMG_0068a

Add orange-jalapeño mixture, and return to boil for another 20-25 minutes or until you reach 222˚. At this point, the preserves were almost ready but they seemed overly foamy, so I added 1/2 teaspoon of butter, which helps cut it down some.

IMG_0083a

Remove from heat and stir in the almond extract. Ladle directly into your waiting hot, sterilized jars. Leave a quarter inch of headspace. Remove any air bubbles and and be sure to wipe the rims clean. Lid and process in a boiling water bath for 10 minutes.

IMG_0192

The resulting preserves were spicy, but not so spicy as to overpower the peach flavor. They retained a pleasant sweetness - I swear I could taste the honey. I sampled a bit on some stovetop toast sliced from a baguette I had on hand - as usual - but this time with a taste of cream cheese, which really made for a winning combination.

August 5, 2009

Peach Party: Crème fraîche peach pie.

I ended up with ten pounds of peaches this weekend. They were cheap, fresh, and smelled absolutely amazing. I got them home and started digging for something to make. Without thinking too hard, I decided that a peach pie was a must. I have made many a peach pie, all the same recipe, and while they were always good, I really wanted to try something different. I flipped through my cookbooks and recipes, but was not finding what I wanted. When I remembered that, during a recent crème fraîche project, I had stumbled on this recipe in a back issue of Martha Stewart Living (I know, I know - it was not mine) and decided that it was right, if slightly modified.

IMG_0051a

Cme Fraîche Peach Pie:


Pie crust:

1 1/4 cups all-purpose flour.
1 cold stick of butter, cubed.
2 tablespoons sugar.
1 egg yolk.
ice water.
salt (optional).


Streusel:

1/2 cold stick of butter.
1/4 cup confectioners' sugar.
3 tablespoons all-purpose flour.
1 teaspoon cinnamon.


Filling:

4 to 5 medium peaches.
2 tablespoons sugar.
1 tablespoon all-purpose flour.
salt.


Be sure you have made your crème fraîche a couple days in advance. There is no substitute for time on this step.

Start by preparing your pie crust. You will need ice water, so fill a small bowl with ice cubes and add water. Set it aside. Now, in a large bowl, sift together the flour and sugar. If you are using unsalted butter, I recommend adding a pinch of salt now.
Cut in your cold butter. You can use a pastry blender - but a fork works just as well. Work it evenly, but stop when the meal becomes coarse - you do not want to over-blend your dough. Add the yolk and mix until just distributed. Next, add the ice water, starting with just two tablespoons worth. I only needed the two tablespoons, but you might need more - just be sure to add them one at a time.
At this point I begin working the dough by hand in the bowl. Begin gathering the dough in the middle of the bowl. Once the dough begins to hold up, turn it out on your work surface, form it into a ball and wrap in plastic. Refrigerate it for at least one hour and no more than a couple days.

Now, the streusel. In a medium bowl, sift together the sugar, flour and cinnamon. Cut in the butter until the mix resembles course crumbs. Set them aside. You can make the streusel at the same time as you are preparing the dough - just cover with plastic and refrigerate.

After the dough has chilled, prepare a floured work surface and roll it out. Often recipes specify a thickness (1/8 inch thick, for example), but this inevitably leads to dough waste. Instead, have your pie plate on hand and roll until it is about an inch and half larger in diameter (slightly more than 12 inches in diameter for a normal pie plate). Transfer to the plate and fold the excess around the rim under and crimp as you see fit. I fancy the more rustic and uneven look myself.

IMG_0099a

Depending on how you feel about par-baking your crust, you could do that now. I admit I do it sometimes, but for this pie, I skipped it. Tune your oven to 375˚ for pre-heating.

IMG_0090a

Next, prepare the peaches. Thoroughly wash your peaches - especially if they are store bought. Slice them into eighths, discarding the pits and stems along the way. Place the slices in a medium bowl and sprinkle with the sugar, flour, and a pinch of salt. Toss ever so gently to distribute the goodness. Let sit for at least 15 minutes.

IMG_0097a

Time for assembly. Spread enough crème fraîche in the bottom of the pie crust to form a nice layer, about three tablespoons worth. Sprinkle with about one-third of your streusel crumbs. Fan out your peaches, filling any gaps in the pattern with more peaches. Do not be afraid to fill the shell as peaches to tend to cook way down in the oven. Spread another three tablespoons or so of crème fraîche on top and sprinkle with the remaining streusel.

IMG_0116a

Place it in the oven to bake. Check back in about 45 minutes - you are looking for golden streusel and bubbling crème fraîche. Place on a rack to cool for 15 minutes before serving.

IMG_0135a

The results are a pie which is not too sweet - more tart and savory and definitely not your every day peach pie. The crème fraîche sets up into an almost custard like consistency, which compliments the peaches perfectly - because of this, it is almost better the second day, when served cold, straight from the refrigerator.
More peaches to come. That is all.

jon.

August 4, 2009

Crème Fraîche.

Crème fraîche is the Western European counterpart to the sour cream you find at your grocer. While it is very similar, the fat content is higher, it is a bit thicker, and the taste is richer and slightly more sour.
Making your own crème fraîche at home is easier than you might think. Here is an easy recipe - give it a try!


Crème Fraîche:

1 1/2 cups heavy cream
1/2 cup buttermilk

Pour the cream and buttermilk into a jar or other sealable container. Shake the mixture and leave it to rest at room temperature for about eight hours. Then move it to the refrigerator for atleast 24 hours before using. It should thicken over time and peak at about 4-5 days.
That is all.

jon.

August 3, 2009

baby loves mixtapes // vol. 00


0610091735

beach + _____ = summer

Along with all of my other projects, I have been looking for a way to share music with you on this blog, and now I feel like I have found a decent system and worked out most of the kinks. I think it is time for a test run.

I love making mixtapes. Sometimes I spend hours and days working on one, only to start over completely, and other times the tracks just fall together in minutes and I am done.
This playlist got thrown together awhile back and had it on my ipod for a test listen. It sat neglected as an unfinished playlist but one day I needed something new. I liked it so much that I have not changed anything and have been listening to it for over a month straight.
I want to share it with you now - enjoy.


baby loves mixtapes // vol. 00


01 Dnttakemy Wingss Away - Islands
02 Weakest Part - Yo La Tengo
03 The Wisp - Simian
04 Dreamer - Tiny Vipers
05 Earthly Bodies - J. Tillman
06 Beach on the Moon (Recycled Lyrics) - Kurt Vile
07 Two - The Antlers
08 Talamak - Toro y Moi
09 Freeway - Kurt Vile
10 Sun Was High (So Was I) - Best Coast


***

Look for volume one in the near future. That is all.

jon.